Aclaración / Disclosure:
Esta entrada se publicó en Español originalmente el 21 de julio de 2011, puedes consultarla aquí: Lecciones del Curso de Automaquillaje Vol. 08: Contouring & Highlighting, paso a paso (ejemplo con cara redonda)
This post was originally published on July 21, 2011. Since I would explain basically the same I did at that moment, and since my face was rounder at that moment, I thought it was better to translate this previously done tutorial. This is also another alternative, of contouring from the one I showed last Monday, and also using different products.
Here’s the post:
Some days ago I had the opportunity to take step by step pictures about contouring with concealer. I’ve seen videos and blog posts about contouring with powder, but the truth is a more elaborate makeup is done with concealer or foundation that is at least 2 shades darker than your skin. To do this, you will need:
- Concealer, at least 2 shades darker than your skintone, and preferably with a cool undertone. Today, I’m using Mac Prolongwear conclear in NW40, but if I could have found NW45-50 I would have been happier.
- A foundation your shade. I think for this is better if you use a medium to high coverage one. I can’t imagine how to blend the shades with a tinted moisturizer, but I guess that can be done. Anyway, I’m using Giorgio Armani Designer Modelling Compact Foundation in 5.
- A lighter concealer, it can be ivory (for tan or olive complexions) and lavender (for very fair skins where ivory wouldn’t show up).
- Some loose powder to set your makeup. I normally use Guerlain Météorites, but Kryolan loose powder works also well.
- A compact powder one or two shades darker than the you normally use, and that is to set contouring. I’m using Mac’s Mineral Skinfinish Natural in Deep Dark.
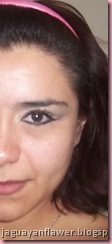
Here is a pic of half my face before contouring (my eyes are already done). You can see my skin without any makeup and that’s also my lips natural shade (mauvish), that kind of explains why I have difficulties with nude lipstick.
The steps are:
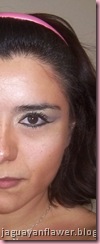
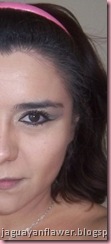
Dark Concealer
With a concealer brush you need to do the corrections on cheekbones, nose, forehead and jawline.

Since I have roundish face, my cheekbone correction goes a bit close to my nose and the line is horizontal, then vertical. I also do vertical lines on my nose. Vertical lines make things look slimmer, while horizontal make look wider. These are the kind of dark corrections that Keira Knightley and Isabeli Fontana get done.
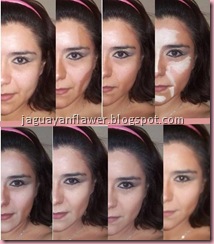
After appliying dark concealer, I buff with a sponge –preferable the ones that look like little cheese portions.
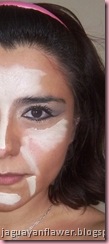
Light Concealer
I take a bit of light concealer and apply on the bridge of nose and go up just to from a kind of fan on the forehead. I apply also on cheekbones, chin and just next to where dark contour line finishes. You can also apply on every fine line you want to make less evident.
I buff again with my sponge –a one that doesn’t have any dark concealer.
Foundation
Apply your foundation and buff it. You must first apply where you didn’t use dark concealer and then your buff it, so there is no way to see a clear line where dark ends and light starts and viceversa. 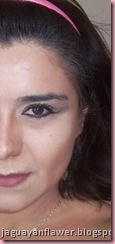
I like to use a sigma F80, or any dupe to it, to do this buffing job.
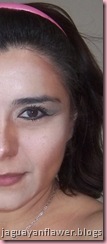
Powder
You set with loose powder and a puff. You also seal contouring with a darker powder and a contouring brush.

And done!!!
One year after:
- Never, ever use MSFN Deep Dark on its own as contour!!! In combo with Mac Prolongwear NW40 looks dark, but on its own, it goes orange and we want to avoid orange.
- I did dark contouring with a concealer brush; however I’ve found better tools for that. Please read the forthcoming post on contouring brushes for better ideas.
- I used to buff with sponges (the ones that look like little cheeses), but I would now rather do that with a Beauty Blender.
- I’m afraid I used too much of light concealer in this attempt, hopefully I’ve improved that part.
- I still use Sigma F80 dupe to buff my contouring, it’s one of my favorite brushes –mine is by Coastal Scents.
After these 2 posts, I hope you have a better idea of what contouring is. I’m continuing this series talking about products and tools I’ve used to contour, and also showing some other application methods –including different shades and lighting conditions. Also, if anyone is interested in help about contouring, I will be very pleased to help, just send me your pic to jaguayanflawer (at) gmail (dot) com. In case you want to post in this blog your contouring ideas, you can also send them to the latter address.


Pues te queda de maravilla!! Yo ya casi tengo la entrada preparada! :D Besos
ResponderEliminarMaravilloso como te quedo..tengo q aprender a hacer un make asi ..besossss
ResponderEliminarwww.cosasde-ladydiva.com
Que bien que lo has explicado! Yo la verdad es que no soy de usar contorno, ni tampoco iluminador salvo en los pomulos...
ResponderEliminar